
Connections with SAE flanges offer concrete advantages in numerous applications
SAE flanges are ideal for high operating pressures and can withstand even violent shocks and vibrations in the hydraulic system
Connections with SAE flanges in the standard pressure and high pressure series according to SAE J 518 C and ISO 6162-1/2 offer various specific advantages in numerous applications compared to tube couplings and other connection types of the same nominal size. This is because SAE flanges are not only suitable for high operating pressures and withstand even heavy shocks and vibrations in the hydraulic system. Particularly in larger nominal sizes, they can be installed with relatively little effort, because the required tightening torques are distributed over the four socket head screws, in contrast to tube fittings. The resulting elimination of bulky open-end spanners allows SAE flanges to be installed in confined spaces.
Learn more on this page about the 6 essential steps in the assembly of SAE flanges that allow you to make absolutely leak-free connections between pipes, tubes, hoses, manifolds and other components.
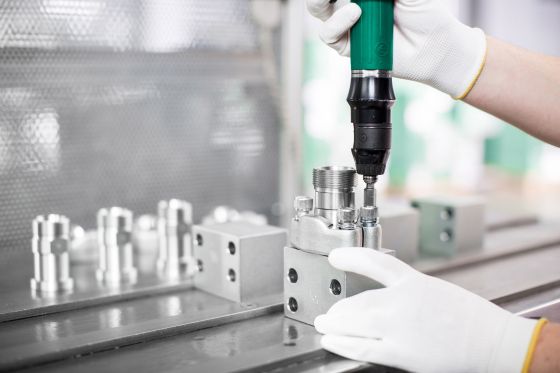
Assembly of SAE Flanges
Essential steps for the assembly of SAE flanges
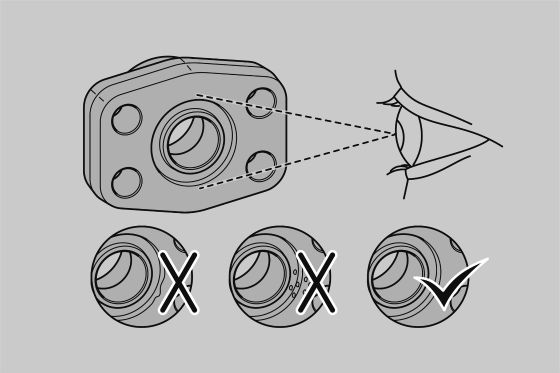
Step 1
Check the sealing surface and the o-ring groove of the SAE flange for visible damage (scratches, cracks, notches, sharp edges or burrs) and make sure that both are free of contamination and any foreign particles. Circular machining marks up to a surface roughness of Ra max 3,2 (ISO 1302) are acceptable and do not influence the performance of the SAE flange connection.
Scratches with a width greater than 0,13 mm (.0005 in) running perpendicular, radial, or spiral on the sealing surface or in the o-ring groove are not acceptable.
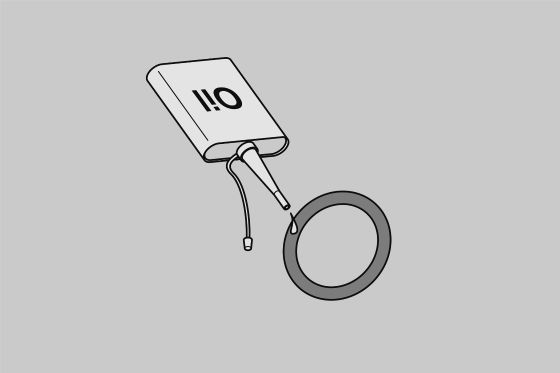
Step 2
Lubricate the o-ring using the system fluid (or a compatible lubricant) and immediately proceed with the assembly in order to avoid exposure to contamination.
Do not use lubricating grease!
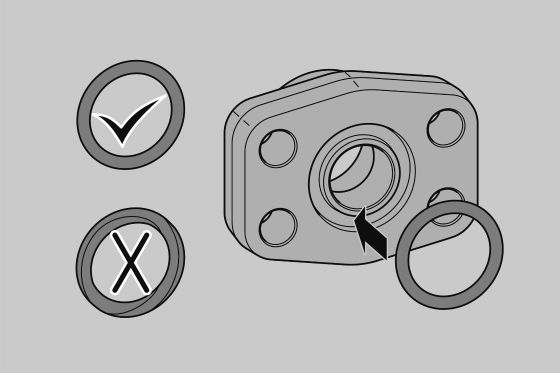
Step 3
Place the o-ring into the o-ring groove, making sure that it is not twisted.
Step 4
Position the SAE flange against the mating component.
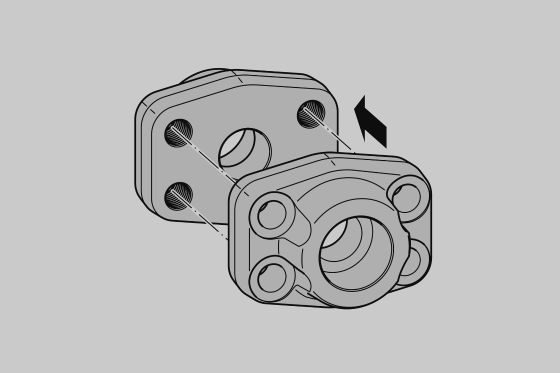
Step 5
Place the socket head screws (with spring washers) into the SAE flange and hand-tighten.

Step 6
Finish the assembly of the SAE flange by gradually tightening the socket head screws in small increments and in the displayed sequence to the appropriate torque level (see tables below).
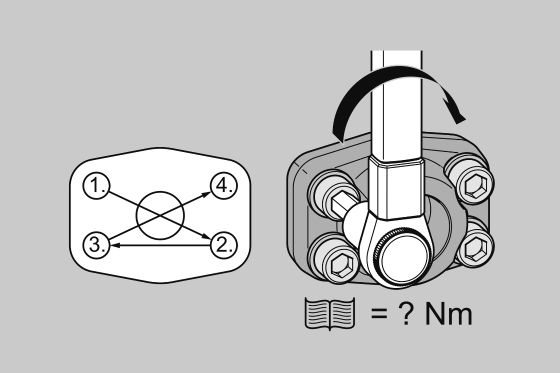
Recommended Tightening Torques
Recommended tightening torques for bolts with standard property class (10.9)
Recommended Tightening Torques
Recommended tightening torques for bolts with old standard property class (8.8)
Important Notes
Attention: All bolts have to be pre-tightened before applying the full tightening torque to the bolts. Otherwise, the flange may break.
Please note that the tightening torques as stated on this page are only recommendations. These values correspond to oiled bolts with a friction coefficient of 0.17 and the material combination Steel/Steel.
The exact tightening torques depend on factors like material, finishing, coating and lubrication of the components used, and have to be determined by the user himself.
Please contact STAUFF prior to the assembly for torque recommendations for alternative mating materials.
STAUFF SAE Flanges
The STAUFF Flanges product group is closely aligned with the market requirements and contains an extensive range of single-part and multi-part SAE flange connectors in the standard and high pressure series according to SAE J 518 C and ISO 6162-1/2.
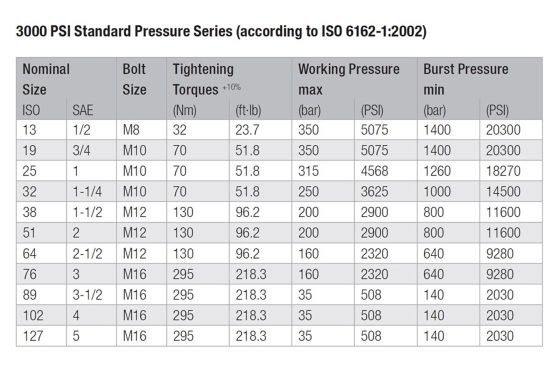
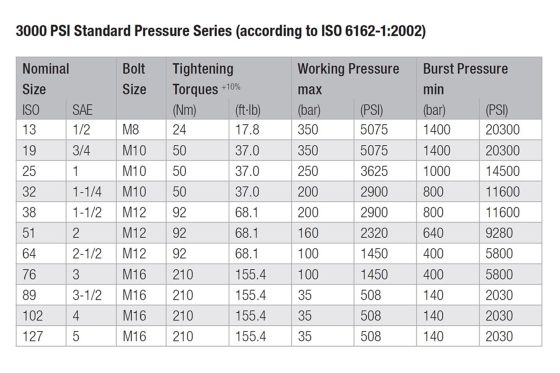
The Standard-Pressure Series (3000 PSI) contains flange components with maximum operating pressures between 35 bar and 350 bar or 508 PSI and 5075 PSI and is available for a variety of nominal sizes between DN 13 (1/2") and DN 127 (5").
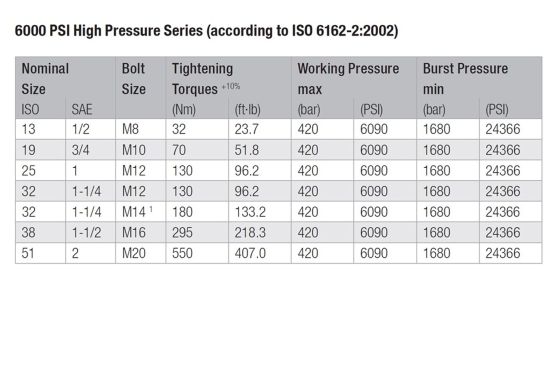
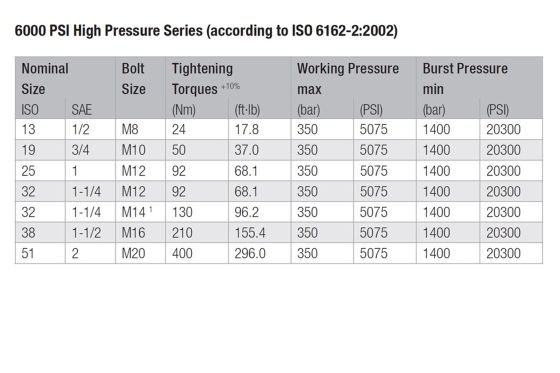
The 6.000 PSI High-Pressure Series is suitable for maximum operating pressures up to 400 bar or 6090 PSI and covers nominal sizes between DN 13 (1/2") and DN 76 (3"),
STAUFF SAE flanges are used as a reliable alternative in applications where of the use of regular tube fittings is not permitted or technically not possible due to the required operating pressure, the size or the limited mounting space.
Their biggest advantage of SAE flanges is the considerably higher pressure resistance for most sizes and the continuous pressure level of the 6.000 PSI High-Pressure Series which can resist maximum working pressures of up to 400 bar.
STAUFF SAE flanges are most notably used in various fields of industry including industrial hydraulics, mobile hydraulics and shipbuilding.
SAE flanges are supplied by STAUFF both as single components without additional accessories and as complete parts including seals made of Perbunan and metric or UNC bolt setz.
STAUFF SAE flanges are made of steel - the exact steel quality and the surface finishing depend on the part itself and also on the chosen type of connection. Stainless steel and alternative sealing materials are also available on request.
The STAUFF Flanges product group in completed by various types and designs of straight gear pump flanges and elbow gear pump flanges made from carbon steel and aluminium in accordance with German and Italian connection standards.
Rate and Comment
Rate posts in the STAUFF blog with just one click or leave feedback and suggestions as a comment – without registration
The editorial team of the STAUFF blog appreciates feedback and suggestions. Accordingly, readers can now not only rate all posts, but also leave comments as guests without prior registration.
And it's that simple:
- Read or view the article.
- Scroll to the bottom of the page.
- Rate the post with just one click.
- Enter a comment.
- Submit your comment as a guest (only your name is required) or create a user account.
- After the comment has been reviewed and approved by the editorial team, it will be published online.

What do you think of this new feature?
Please share your opinion with us now using the rating and comments function!

Newsletter Subscription
Receive automatic e-mail notifications about new posts on the STAUFF Blog

